Neiva programming blog 3

I’ve been programming the main player character. That includes movement, jumping, groundchecking, health, sticking to platforms and physics… At the beginning I create one whole Unity script that handled all that, till reacently when we had to change from Unity’s 2D physics to 3D physics. I split up the script to mulitple scripts/components that handled specific tasks.

NeivaController1

The picture above is before separated components. The picture under is after, with separated components.

NeivaController2

This approach has led to more reusable code because you got all things separated. For example, the Groundchecker-script handles ground checking for different slopes and such and can be used for other parts of the game, like AI enemies and more.

Neiva programming blog 2

I’ve been working on the player character movement. That includes running, jumping, land on moving platforms, move WITH moving platforms and more… I’ll now talk about how I created the jumping movement.

In the Neiva game we have the main character the player controls: NEIVA. It’s a two legged little creature that looks cute, colorful and non-realistic. In the game, we did not want realistic movement. A realistic jump would be a single jump force up from the ground and then gravity takes over and pulling the character with a constant force downwards. The result would be a perfect sine curve that has the same shape in the upwards as downwards. For Neiva we wanted the shape of the jump be more asymmetrical, where the jump has a longer hangtime than the fall.

We are working with Unity3D which has a lot of tools to offer when programming games. One of those are the AnimationCurve (http://docs.unity3d.com/ScriptReference/AnimationCurve.html). AnimationCurve is a data type that works as a curve with multiple points that shapes all different kinds up curve shapes. What’s so good about AnimationCurve is that it appears in the Unity inspector if you give it the keyword ‘public’ (or using Unitys ‘[SerializeField]’ for ‘private’ variables to show up).

curve in inspector

If the curve is clicked in the inspector you get a new window showing just the curve. Inside that window you can edit the curve, add more points and shape the curve however you want (except making loops.).

look at that curve

The curve above, you see, sort of flattens out at the end. This is sort of the behaviour we would like the jump to be. It becomes an extra hangtime.

To implement this I used the method AnimationCurve.Evaluate(float). The method takes a float value that represents the x-axis of the curve and returns the y-value at that perticular point. The x-axis goes from 0 to 1 and has to be considered (actually, you could make it extend even further, or even higher). I divided the current time in the jump with the jump duration and used that in Evaluate(). I multiplied the result with the desired jump height and used that to move Neiva in y-axis (up-down in world space). I used Unity’s gravity settings handle the falling after the jump.

OwKtVp

A jumping capsule. It’s evident (in my eyes) how it ”hangs” in the air at the end of the jump. Especially clear when you’re controlling the jump by yourself. The result is what we wanted.

Our game designer can now tweak the shape and the ”feeling” of the jump, simply by open and edit the AnimationCurve. I like the result!

// Joha2nes

Neiva programming blog 1

boop32

Project Neiva is a new game project with a group of seven students. The game is a 2.5D sidescrolling platformer where the player run, jumps and uses projectiles to teleport through tricky obstacles. The project is part of the course Big Game Project that lasts in 8 weeks until exhibition in the yearly Gotland Game Conference.

unity

This blog is about game programming. In upcoming  blog posts I’ll write about tasks, progression, decisions makings, problems and good things that happens in the project. We chose to use Unity3D as the main development tool as it provides a powerful editor and a programming framework. Because of Unity3D the programming is based around Unity’s component based system and scripts for game behaviours. C# is used as the programming language.

In the blog I’ll talk about dynamic cameras, platformer movement, state machines and more. Those are tasks that I’ve already started on. More posts will be up during this week!

//Joha2nes

Code review för Semihs LinkedList och BinarySearchTree

————-Linked List————-

Metoden Find saknas i LinkedList. En Find-metod ska finnas enligt uppgiften.

Övriga metoder fungerade bra. Genom unit-testing upptäcktes inga fel. Metoderna gjorde så som man förväntade sig. Genom visual studios debuggnings-verktyg gick det även att se att elementen i listan placerades korrekt efter användning av metoderna.

Petitesser:

..skulle placera ‘Node’ structen i samma .h-fil som ‘LinkedList’, förslagsvis som private i LinkedList-klassen, för att göra ‘LinkedList’ oberoende av andra lösa filer (Node.h).

Namnge ‘leftNode’ och ‘rightNode’ som ‘previousNode’ och ‘nextNode’ för tydlighet (enligt mig…). Dessutom hade nog bara en ‘nextNode’ behövts för varje node. Från en av .pdf-filerna (från lektioner) har du gjort en ”doubly”-LinkedList, där noderna pekar på både sina föregångare och nästa nod. Det funkar ju.

Metoden ‘At’ returnerar int-värden i rad 102 och 107 och kan därför inte användas med datatyper som inte kan kastas om till nummer-värden, bl.a. egna klasser och structs. Exempel: om en ‘LinkedList<Vector2>’ skapas och ska använda metoden At så kan inte programmet kompileras enligt Visual Studio. Samma gäller metoderna ‘First’ och ‘Last’. Dock spelar det ingen roll för uppgiften eftersom de inte ingick i uppgiftens kriterier.

————-Binary Search Tree————-

Metoden ‘insert’ lägger till nya noder då ett värde redan finns i trädet. I exemplet nedan borde andra och tredje ‘Insert(2)’ inte lägga till nya noder eftersom värdet 2 redan finns i trädet(Tommi Lipponen, föreläsning).

BinarySearchTree<int> tree;

tree.Insert(2);
tree.Insert(2);
tree.Insert(2);
tree.Insert(1);
tree.Insert(3);
tree.Insert(4);

verify(4, tree.Size(), ”Size() after 6 inserts where 3 are equal values”);

konsolen: ”Failed! Expected: 4 Got: 6 – Size() after 6 inserts where 3 are equal values”

Utöver detta fungerade BinarySearchTree bra. Metoderna fungerade så som man förväntade sig om dom. Genom unit-testing upptäcktes inga fel. Metoderna In_Order_Traversal, Pre_Order_Traversal och Post_Order_Traversal testades genom Visual Studios debug-verktyg där värderna och ordningen på alla Node’s kollades om de stämde. Likadant gjordes när Node-placeringarna stämde rätt när man använde Insert för att lägga in värden i BinarySearchTree.

————-RESULTAT—————

FAIL:

1. Skapa en Find-metod i LinkedList som returnerar true om ett värde finns i listan och false om ett värde inte finns i listan.
2. Ändra så att inga dubletter med samma värden läggs in i BinarySearchTree genom Insert-metoden.

/Johannes Westberg

Code review för Jens LinkedList och BinarySearchTree

——- LINKED LIST ——–
Linked List fungerar som ska. Genom unit-testing upptäcktes inga fel. Metoderna gjorde så som man förväntade sig. Genom visual studios debuggnings-verktyg gick det även att se att elementen i listan placerades korrekt efter användning av metoderna.

I konstruktorn för LinkedList sätts inte m_root till nullptr. Koden fungerar ändå som det ska, men att ha satt m_root till nullptr manuellt hade bidragit till mer tydlighet (enligt mig).

LinkedList printar saker i konsollen genom  vissa metoder resulterar i olika saker. Eftersom klassen inte innefattar jättemycket kod känns det onödigt, till skillnad från lite större program. När LinkedList användes blev det störande när den printade ut grejer på konsolen när jag själv printade egna grejer på konsolen. Metoden ‘Find’ printar ut ”ERROR:[…]” när värden inte hittas. Att ett värde inte hittas kan ibland vara precis det man vill, istället för att det räknas som ett ”ERROR”. Det hade räckt med att bara returnera ‘false’. Dessutom underlättar det att inte behöva bry sig om att printa ut grejer när det inte riktgt hör till uppgiften. Man kan fokusera på de faktiska problemen utan att behöva kladda ner koden med orelevanta saker. Vid debuggning förstår jag dock fördelen.

 
——- BINARY SEARCH TREE ——–
Metoden ‘insert’ lägger till nya noder då ett värde redan finns i trädet. I exemplet nedan borde andra och tredje ‘Insert(2)’ inte lägga till nya noder eftersom värdet 2 redan finns i trädet (Tommi Lipponen, föreläsning).

BinarySearchTree<int> tree;

tree.Insert(2);
tree.Insert(2);
tree.Insert(2);
tree.Insert(1);
tree.Insert(3);
tree.Insert(4);

verify(4, tree.Size(), ”Size() after 6 inserts where 3 are equal values”);

konsolen: ”Failed! Expected: 4 Got: 6 – Size() after 6 inserts where 3 are equal values”

Utöver detta fungerade BinarySearchTree bra. Metoderna fungerade så som man förväntade sig om dom. Genom unit-testing upptäcktes inga fel. Metoderna In_Order_Traversal, Pre_Order_Traversal och Post_Order_Traversal testades genom Visual Studios debug-verktyg där värderna och ordningen på alla Node’s kollades om de stämde. Likadant gjordes när Node-placeringarna stämde rätt när man använde Insert för att lägga in värden i BinarySearchTree.

 
——- RESULTAT ——–
Fail – Fixa så att inga dubletter med samma värden läggs in i BinarySearchTree.

/Johannes Westberg

My summer game project

This week I started with a new game project. The project is sort of a summer course (during 9 weeks) where students and I from the Game Programming program in Uppsala University have the opportunity to develop our skill on game programming. It’s my first year in this school so I have still much to learn.

In this blog I’ll share my thoughts and decisions that I make during the process of this project. It’s C++-programming so mostly all my blog-posts will be focus on just code. Fun FUn

What’s the game?

The game I’m going to do is a clash between Star Wars and the game Soldat. Soldat is a polski game, made by one person, that’s a 2D arena side-scroller which could be seen as a mix between Counter-Strike and a realtime-version of Worms. My game takes place in a Star Wars scenario. Instead of modern weapons there will be laser guns and lightsabers and jedies. Hopefully, if the project goes well, I’d like to implement elements from StarWars: Battlefront, like big team battles, and capturing bases, but I’m to be realistic and keep the project as simple as possible. Therefore my goal is to have a 2-player mode where two users control their own character and fight against each other, similar to Soldat. The amount of content depends on how much time I have over.

About copyrights and licenses, I don’t know what conditions there are for using content from Star Wars. For now, I won’t take any credit or income for this game.

Screenshot from Soldat w/ elements from Star Wars. Excuse my speed programmer art.

My method.

The programming language I’m using is C++ with the help of Microsoft Visual Studio as a programming environment. I’m also using the SDL-library (Simple DirectMedia Layer) for extra functionality such as audio, window, user events (keyboard, mouse, joystick.. you name it), OpenGL and etc., in short: SDL’s a great library for game making. I’m using an object oriented style of programming.

I’ll have classes titled as Managers, where each manager manages specific tasks that are essential for the program. Some of these managers are ”StateManager”: managing all the different states in the game (ie game-state, menu-state, intro-state and more), ”DrawManager”: drawing textures/pictures to the game window, ”InputManager”: handles different input-devices (keyboard, mouse..) and more and more.

All physical objects in the game will have their own type ”GameObject” which they can derive and branch out from and make their own kind of ”GameObject-Types”, like the player character, trees, ground, projectiles, etc.

What’s next

I’m going to sit flat on my ass flat for this next week till next blog-post. I’ll tell how everythings going. I’ve already started with some sort of engine-class for the program. I’m also prioritizing how all the different game states will be managed through a StateManager-class. Because I think that’s important..

Hopefully the next blog-post will be more intimate to the project. I’ll share all the guts and code of the game. I hope to give clarity of what I’m actually making and creating this summer! I’m looking forward for this!

/Johannes Westberg

Generating our maps

I’ll talk about how we manage to create maps in our game Green Warden in a way so our designer understand how to write new maps and send them as textfiles to us programmers to implement in th game.

I encouraged our designer to use the free-to-download program Tiled (http://www.mapeditor.org/) to create new maps. With Tiled it’s possible to save what you do as textfiles. We’re using these textfiles to load different maps. In this way our designer doesn’t have to know programming to know how to create all the maps in the game.

Tiled

This is how it looks like in Tiled. In this example the green tiles represent trees, blue is water. The yellow tile is the ”Life Tree”, the player must defend that. Pink is player spawnpoint and reds are enemy spawnpoints. Grey tiles are ”empty”-tiles which are nothing but background.

Tiled_txt

When projects in Tiled are saved as textfiles you get something like this above ^. Every tile is seperated with commas where, in this case, ‘1’s are trees, ‘2’s are water tiles, ‘3’s is the Life Tree, ‘4’ for player spawnpoint and ‘5’ for enemyspawnpoints… Zeros is the empty tiles as you may have guessed already.

Now its all about translating this gibberish to a map in our game.

In our gamestate, which is prabably no exception from what most games has, we have a function called LoadMap(”[file name here]”). At the beginning of the gamestate we call this function with a specific filename, example ”assets/maps/map_42.txt”. Inside the function, this happens, explained in pseudo-style:

– function LoadMap(‘filename’)

–             Open file: ‘filename’

            while opened file is not at the end

–                               stream file-data to ‘temp_variable’

–                               switch (‘temp_variable’)

–                                              case ‘1’: new Tree; break;

–                                              case ‘2’: new Water; break;

–                                              case ‘3’: new LifeTree; break;

–                                              case ‘4’: new Player; break;

–                                              case ‘5’: new EnemySpawnpoint; break;

–                                              case ‘0’: break;

… and so it goes in the loop till the filestreamer reached the end of the file. Note, pseudocode experts, I’ve never done pseudocode before. Let’s say this is my own version to do it ;P

When each object is ”newed”, our Tilemap-class is in charge of the positions of each tile, so basically, the whole textfile could have been written in just one line and still have each tile-object positioned in the right place. It just depends on the order of each number. The Tilemap-class is just basically a grid of specific number of sqaures on the screen.

Generated map

(Note: this is not the same map as the examples above)

Right now there’s no water-tiles. Those are on its way. The tricky part there is to make them dynamicly change shape depending if multiple water-tiles are linked to each other. That work is saved for later. Beta versions supposed to be completed next friday, so there’s a lot of other stuff that has to prioritized.

I hope this read gave you some idea we do to generate our maps. Please comment if you feel there’s too little technical explanations, like snippets from the code and etc.

/Johannes W

My first A*pathfinding

This week my job has been to create a pathfinding system for our game Green Warden. For tower-defence-like game it needs a pathfinding system thats not just functional but also cheap for the processor to handle. As some probably know a tower-defence game could have hundreds of enemies on screen at the same time searching their way through a maze and obstacles. Sometimes the enemies must also be able to interrupt their current path to attack nearby towers and then, if they survived the tower of course, they return to the path towards the main destination.

There are certainly different methods to tackle this problem, and maybe some techniques works better for some projects than other. For tower-defence type games, where all foes on screen share the same target on the map (in most cases in tower-defences), there are for example one method to make all units share just one pathsystem that covers the whole map instead of having every unit search for unique paths themselves.. I’ll mention more of that later in this text.

Experiencewise, I’ve never coded any pathfinding or AI before. Last weekend I started looking around on internet for good information about this subject. Quickly I stumbled upon a technique called ”A*(a-star)-pathfinding”. At first was difficult to grasp.. As a half-novice programmer I can take some time to find tutorials on the internet thats actually easy to understand.. Actually I found a video on youtube that explained A*pathfinding in a way that made total sense to me. Here’s a link to that for those who are interested: https://www.youtube.com/watch?v=-L-WgKMFuhE

I was lucky this too because our programming-teacher just so happened to talk to us students about the A* methology.

Since then I’ve been working to create a pathfinding that we can use in our project, for now.

Sooo. the result,

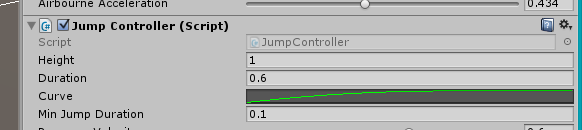
For the type of pathfinding I’m doing I need a grid or tilemap. I think posted 2 weeks ago explaining about a tilemap I made. Since that post it has been some changes and upgrades to make the tilemap more easy to use and optimized. I’ll explain that tilemap quickly: first you create the whole tilemap with specific number of tiles and the size of each tile in pixels. Then you can access each tile by index, position or coordinate. Each tile has the values ”state”(can be ‘true’ or ‘false’), position and index. Every tile with the ”state”-value = ‘true’ tells the tile is occupied by something, tower, tree, obstacle, whatever. Every tile with the state ‘false’ means its empty from stuff, and therefor passable,

The pathfinding has to check each tile on the tilemap whether the state of the tile is ‘true’ or ‘false’; ”obstacle” or ”empty space”. The code for my Pathfinding is written seperately from the Tilemap, so the pathfinding has to now what states each tile has on the map, position and coordinate of each tile and etc. After that comes all the math and logics for the pathfinder to generate a path from point A to B on the map.

path1

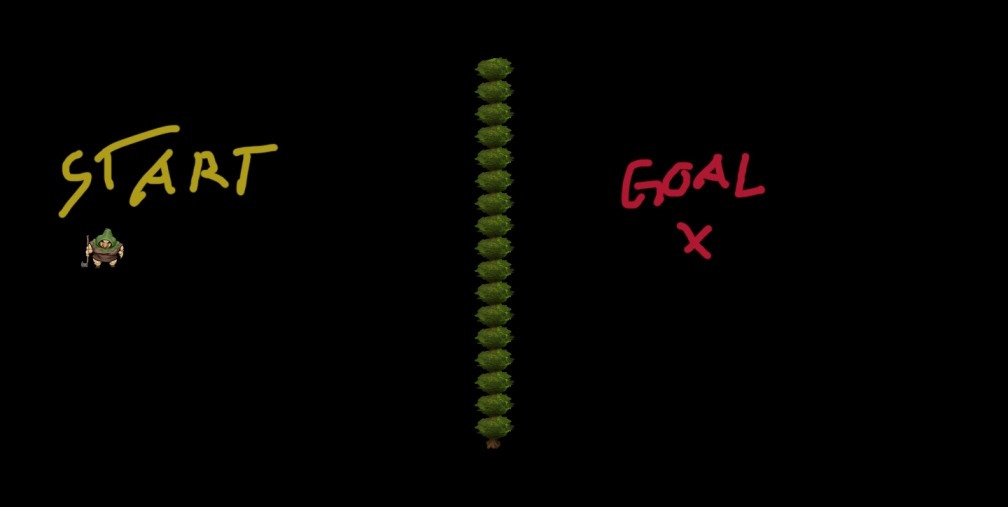
I made a small program to test and debug the code. It consist of a tilemap with obstacles (in this case some trees) and the code for pathfinding. You can chose were the start and the goal should be with an easy function ”set_start position” & ”set_goal position”.

(Btw, I’m not going too much into the technical details so just enjoy the pictures if you want)

path2

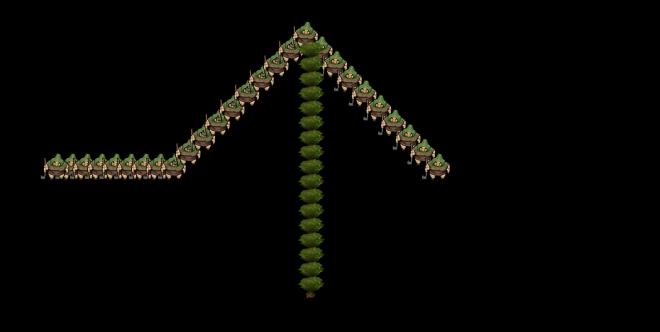
Each time I press a key on the keyboard the character moves one tile-step on the calculated path.

path3

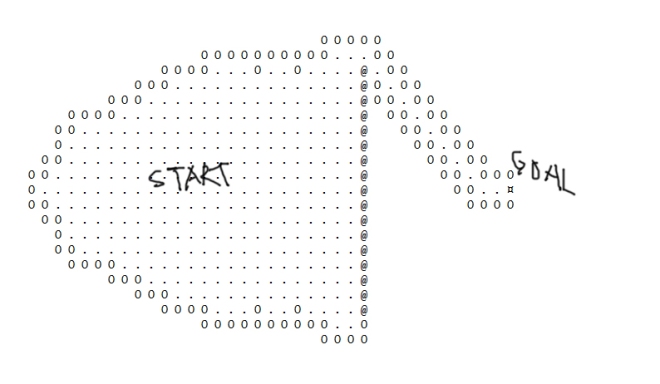
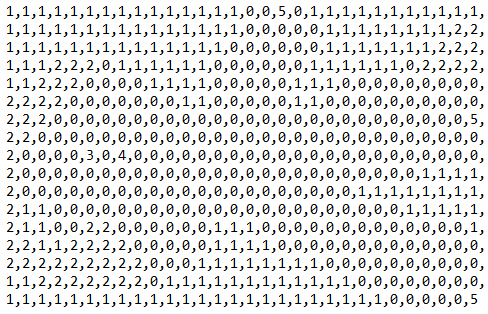
This picture may be confusing, but it’s a result of the calculation from the example above written to a text-file. I’ll do my best to explain whats happening short and concise.

The @:s represent the trees, which are nonpassable. The dots represent tiles that has been checked as ”maybe a possible path to our goal?”. Why is it checking AWAY from goal?? To be honest, I’m not 100% sure, but I think it’s just a consequense for the of alghorithm that A* uses. I need to read more about that however. The O:s places that’s passable but not checked because there’s a tile somewhere else that’s closer to the goal destination… I hope I didn’t make you more confused! Please check that youtube-link I mentioned before if so..

path7

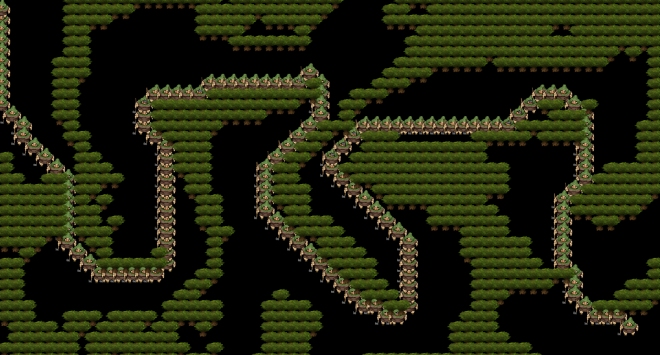
Heres an example of a much more complex route. What’s nice is no matter how complex the path is the principle falls the same as the simple example above. It checks all tiles that passable with no tree on it and prioritize tiles currently closest to the goal till it finally found the goal tile. Of course, with this map the pathfinding system has to check more tiles but as soon as the pathfinding algorithm works properly it pretty much do all the work by itself.

I said before that there’s not just one pathfinding techniques out there. Now it looks like were going to use this pathfinding I made for the project as a temporary solution, but we will probably come to a point where we have to optimize it so it works well with lots of enemies on screen at the same time. I mentioned, instead of having every enemy calculate a unique path for themselves you can instead calculate a ”global” path for the whole map that starts from the target destination which all enemies share. More explanation here:

http://www.redblobgames.com/pathfinding/tower-defense/

The goal from now on is to focus on other stuff that must be done for Green Warden. Next week I’ll start making all sounds as I’m responsible for that. I’ll probably write about that next week too.

See ya for now!

// Johannes

fixed TileMap

The game I’m working on, as a programmer, is (temporary called) Green Warden. This game is sort of a Tower Defence where the player runs around with an avatar, planting seeds that grow up to projectile-shooting trees (towers) against army of lumberjacks (and flamethrowers).

When the players are building their trees/towers we wanted each tower to fit in in a fixed grid of tiles; like chess, where only one piece can be place on one tile.

I wrote a tile map class with three main components: dimensions for each tile (in this case 32x32px), width and height for the whole map (i.e. 30tiles x 20tiles) and an array of bool values where each element of the array represent a tile on the whole tile map. The idea is, when an object is created on a tile, that tile recieves the value ‘true’ so other objects cannot be placed there again, and when that object is destroyed that tile returns to the value ‘false’. This method is hopefully applicable for our oncoming pathfinding too, where, for example, an enemy is looking for empty tiles that has the value ‘false’ which to set a path to walk. All tiles that has value ‘true’ is translated to a non-walkable area for the enemies.

In short sense, tiles where the player builds a tower, that tile should block enemies paths and the player.

When the player places a tower I had to figure out a way to calculate so the tower gets a fixed position one of the tiles on the tile map. The player could be on the position 197×579 on the screen and place a tower and that tower should fit in to a correct position on the tile map.

On this picture I used my mouse to place out the trees. You can see that every tree is positioned on a even order with each tile.

Hello

The calculation is pretty simple:

sf::Vector2i TileMap::getFixedPosition(sf::Vector2i point)

{

            sf::Vector2i fixedPos;

            fixedPos.x = (point.x / m_tilewidth) * m_tilewidth;

            fixedPos.y = (point.y / m_tileheight) * m_tileheight;

            return fixedPos;

}

where ‘m_tilewidth’ and ‘m_tileheight’ has both the value 64 in this example.

Till next time, adios!

switch (5 in a Row) – WIP

5 in a row

This week has been filled with new terms like Polymorphism, friend classes, virtual methods, forward declare, finite state machines… My brain feels melted. As a novice programmer these things may need some time to fully understand.

To help find my confidence again I decided to create a simple code for the game ”5 in a row”. Originally it’s a board game where two players by turns drop bricks on the top of the board where you can see the pieces fall down and stays in a lane. The more bricks you drop in same place the higher they stack up together. The goal is to make a row of five with your own bricks.

NOTE: The picture above is my rendered code from where I am now in the project, therefor theres only one color for one player at the moment.

I want to show one method that I am pretty happy with and how it worked so well with this type of game:

In a ‘board class’ a have a method ‘Set(int index, char brick)’. This method is used to set new bricks to the board.


bool Board::Set(int index, char brick)
{
switch (numberOfBricks[index]) {
case 6:    return false;    // "the column is already full with bricks"
break;
case 5: board[index][0] = brick;
break;
case 4: board[index][1] = brick;
break;
case 3: board[index][2] = brick;
break;
case 2: board[index][3] = brick;
break;
case 1: board[index][4] = brick;
break;
case 0: board[index][5] = brick;
break;
}
numberOfBricks[index]++;
return true;
}

In this method, as you can see, exists a ‘switch’ with an integer array ‘numberOfBricks[7]’ that represent how many bricks there currently are in the specific column. Each element of ‘numberOfBricks’ (7 elements total) is already initialized with the value 0 in the main constructed of the class. When the player, during the game, enter an integer from 0-6 (should be 1-7) the ‘Set’-method recives that value and check how many bricks of each column and then decide where to put brick, as if the brick falls down and lands on top of another brick. ‘numberOfBricks’ is then +1 to ”save” how many bricks there are in that specific column till next player does a move.

I’ve never described code in this way before but I hope this example was understandable. I’m not going into more details on this game but hopefully someone read and enjoyed this 😛